Thursday, July 11, 2013

Leaping Silhouette

I still haven’t gone back to my nude.  As much as I really want to finish him I keep putting other paintings ahead of it.  The fact that it’s so close to being done scares me a little bit.  What if I sit down to finish it and completely F it up?!  The thought makes me feel slightly ill.  No wonder Van Gogh went crazy.  Lol!  So, for now it sits on my shelf so that I can look at it and build up the confidence to get back to it. 

In the mean time I’ve completed another painting.  This one is another figure painting but with brighter colours; I needed a changed from the grey scale of the nude. Using my Anatomy for the Artist book as a reference I decided to make my figure more of a silhouette than a detailed individual.

Getting the basic silhouette painted was relatively easy.  However, when it came time to add the bit of highlighting I wanted, well that took more tries and more time than I would have thought.  In the end I realized that less highlighting is more for this particular piece. 

The bold yellow, orange & reds were the fun part.  Again it took me a bit to figure out the best technique for what I was trying to achieve, but I got there (mostly).  With each painting I learn something new, what works and what doesn’t, what I’m good at and what I need to work on (quite a bit).  It’s a fun learning process and each painting leads me somewhere different.

Friday, June 28, 2013

The acrylics were calling

My apologies for not posting in the last few weeks, but there has been quite a bit of reorganizing going on in the craft room as of late.  I made a decision back in May to end my time as a Stampin' Up! demonstrator and I have been slowly going through my supplies, deciding what to keep and what to sell, and then planning my final card class.

I have had 4 great years as a Stampin' Up! demonstrator.  It is a wonderful company and I have met some lovely creative ladies during that time that I will continue to stay in contact with.  However, right now, my head and my heart just aren't in it from the demonstrator stand point.  I will definitely continue to make cards and scrapbook, but I'm going to take a bit of break.

So what am I filling my craft time with now you ask?  Painting with acrylics!  I am totally obsessed at the moment.  I have been wanting to do this for quite a while but did not have the time, until now.  About 4 years ago I took a 6 session night class at our local community center on beginner acrylic painting and I really enjoyed it. The class itself wasn't a great learning tool as the teacher was more about letting us just express ourselves than teaching us the basics of acrylic painting (which is what I wanted), but I enjoyed it none the less.  At that time I painted a couple pieces and basically tried to figure it out on my own, then I got into stamping and put away the paints.  Then three years ago while I was pregnant with K I decided to pull out the paints and bring them to the cottage for the weekend.  That weekend I started my first nude painting based on a photo from a book 'Anatomy for the Artist'.  I made a good start but once the weekend was over I found I didn't have time to work on it and put it away.  Now three years later I have finally take out that nude painting and am working on it again.  Here is a sneak peak of the work in progress.


In my quest to learn how to paint with acrylics I came across a wonderful guy named Will Kemp http://willkempartschool.com/ who has these great video tutorials on how to paint with acrylics.  In addition to having great tutorials he also has a tonne of information on painting with acrylics, oils and drawing.  Seriously, this guy is awesome!  Not only does he provide very easy to follow step by step video instruction but he has a great sense of humour and is cute to boot.  ;)  Plus I love the music he uses in his videos.  So, if you have ever thought of painting with acrylics or already do, this guy is the place to start.  I'm not kidding, go there, right now.  :)
 
Here is the result of the first tutorial 'Cherry still life' I did from his site.  My painting is on top and the photo we use as a reference is below.
 
 
Now I just need to finish my nude.


Wednesday, May 29, 2013

Repurposed Frames

I've been going through the house lately trying to purge stuff that has been sitting around for way too long.  In doing so I came across a bunch of old pictures and empty frames that I can't bear to throw out.  Frames can be used for so many different projects and eventually I will get around to using each and every one of them.

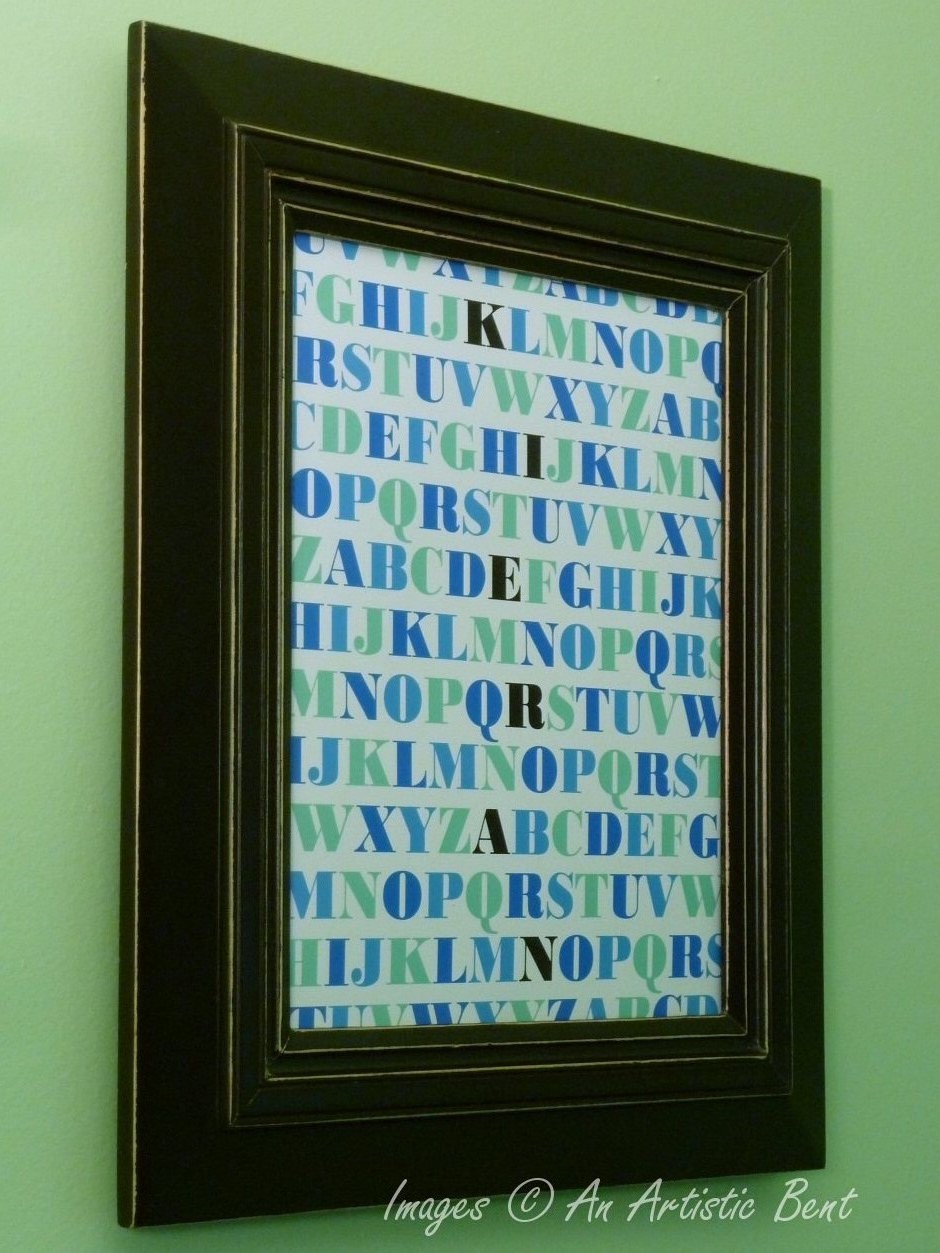
Step one in repurposing the frames - a quick and easy wall hanging for K's room. 

I saw this idea on Pinterest (of course!) and realized that it would be a cute and easy piece of wall art that would not take a lot of time or $$.  Exactly what I needed right now.

This is what I started with.  A very old and dusty oil painting in a nice solid wood frame.
 
And this is the end product.  An alphabet picture which also highlights his name. 


Here it is hanging on his wall above his bed; not that you can see the bed, but trust me that's where it is.  ;)  The colours are more accurate in the photo above.


Such a cute way to showcase your childs name and the alphabet!

Sunday, May 19, 2013

Felted Tote

Felting.  It’s everywhere you look and now it’s on An Artistic Bent as well.  That’s right, I have finally gone and made my first felted item.  I’ve been looking at felted purses, pillows, blankets, etc. for the past couple years online.  It wasn’t even intentional, I just kept coming across them as I surfed and so I finally decided enough was enough and I was going to try it myself.

A couple months ago I took a trip to my local Value Village and searched through the racks for 100% wool sweaters.  I found quite a few and at anywhere from $3.99 to $7.99 a piece plus a 30% discount that day, it was turning out to be a very cheap investment. 


I took them home and ran them through the hottest setting on the washer and dryer a few times until they came out ‘felted’ and then laid them out on my table for inspiration.  One of my favourite Pins was a tote bag that a woman made from a beautiful turquoise sweater and I thought I would try something like that.  Hers was gorgeous but I wasn’t sure if I could do as good a job with the decorative flowers.  Plus my sweaters were darker with more autumn & winter tones, not vibrant like hers.  But I was going to give it a try anyway.

The first sweater I used was lightweight dark grey.  It has a nice texture to it but in the end I found it a bit too floppy.  It’s just not as solid as I would like a tote to be.  So on to the next.

One night after a games night with some girlfriends I decided I wanted to do something crafty.  Now usually I only have one glass of wine on games night but that night I think I was on my third when I stepped into the craft room.  Tipsy and looking to craft, things could have gone one of two ways...turns out I’m a good drunk crafter.  ;)

As I looked at my burnt orange felted sweater I knew exactly what I was going to do.  A couple of years ago I downloaded a pattern for a quilted tote from allpeoplequilt.com but had never got around to using it.  After about 10 minutes of searching through patterns I found it!  It was a simple design that would work well with the felted fabric.  I set to work putting the pattern together on some printer paper, taped them all together and then cut it out.  Perfect.

Next step was to cut a pocket for the inside and then sew it all together.   Done!  I couldn’t believe how fast I was able to go from sweater to tote.  The only thing left I wanted to do was add some embellishment to the outside.  The turquoise tote I had seen on pinterest had some lovely felted roses on it so I thought I would give felted flowers a try as well, but I was going to save that for another night.  It wasn’t going to push my luck.

In the end it took a couple nights to get the flowers all done, mostly because I was figuring out how to do them myself.  There are a lot of great pictures online for felt flowers but no one seems to give instructions.  Oh well, I finally figured it out my way, probably not the easiest or most efficient but it worked.   And in the end I think it turned out pretty good.  Not really a summery tote but it will be good for the winter.


Saturday, May 11, 2013

Baking for a Cause

Last night I made cupcakes for a fundraiser for a local dog rescue that does truly wonderful work. The Valley Boxer & Mastiff Rescue was having a bake sale fundraiser at a pet food store in Ottawa to raise money for their shelter and this was something I knew I had to help out with.  I love my two boxers and I love baking, so really it was a no brainer.

Franklin

Dexter


The Valley Boxer & Mastiff Rescue is an amazing rescue that has taken in, rehabilitated, trained, loved and helped to find forever homes for many dogs over the years.  Feel free to check out their FB page to see all the great work they do.

In the end I made two types of cupcakes, Lemon and Strawberry Lemon.  Originally I was going to make lemon but it only made 18 cupcakes and I wanted to bring at least 24.  :(  So I made another batch and decided to add strawberry purée to the batter instead of the lemon zest used in the first batch.  They turned out great!  After I finished decorating the Lemon cupcakes the power started to flicker (due to the rain storm) so I decided to do a basic icing swirl and half a strawberry for the Strawberry Lemon cupcakes.  I really didn't want to be sitting in the dark trying to do detailed cupcake decorating by candlelight, that would not have been pretty.  Thankfully the power stayed on and all turned out well.

Lemon Flower Cupcakes


Strawberry Lemon Cupcakes
There were so many amazing baked goods at the fundraiser it was hard to choose which one to buy.   I let K decide and he choose some chocolate chip cookies which were delicious!  By the days end they had raised $650 for the rescue and they were going to do it again tomorrow!  Such a great way to help a great cause. 

Wednesday, May 1, 2013

Bloggy Moms May Blog Hop

I just joined Bloggy Moms May Blog Hop!  Come check out all the great blogging Moms below.
 

Monday, April 29, 2013

Simple Wall Art

Over the years when any of my close friends were pregnant I always made something for their newest addition by hand, be that a knit blanket, quilt, stuffed toys, etc...   Then, when I was pregnant I had all of these grand ideas of the blankets, toys and decor I would make for my little bundle before and after he arrived.  Little did I know that my ideas would stay exactly that, ideas.

During my pregnancy I planned a few things I wanted to make for him and I even went so far as to buy some of the supplies, but in the end it always went to the bottom of my to do list.  Sleep & reading pregnancy books/magazines made it to the top.  Plus at that naive stage, I still thought I would be able to make stuff for him once I was on mat leave.  Because hey, I was going to be off for a year and I would have lots of time to make him tons of wonderful items.  Yeah...not so much.  lol.
Shortly after his arrival however the one thing I did manage to make him was some simple wall art for his room.  They were very easy and turned out great I think.


All you need to make these is:
- square framed canvases
- your favourite fabric (to cover the canvas)
- a coordinating dark fabric
- print out of animal silhouettes
- staple gun
- iron-on Adhesive (such as Heat’n Bond)


There are so many possibilities with a project like this.   As K gets older and his room decor changes I am sure that I will be making many different designs with this type of wall art, and hopefully I will finally get around to making some of those other grand ideas I have for him all stored up in my brain.  ;)

Friday, April 19, 2013

Bloglovin'

Blogs.  If you love reading them as much as I do then you know that keeping up with them can be a bit of a pain in the butt.   I've been a bit of a blog hoarder.  I am constantly adding new blogs to my Favourites bar and in the end it has become a tad unmanageable.  It takes me forever to find the blog I am looking for and once I find them, half the time they hadn't been updated.  Annoying! Well, I have finally seen the Bloglovin' light!!  

Bloglovin' is a blog reader that is easy to use and makes my blog reading fun again.  Every time one of my favourite blogs has written a new post, I get notified (an option you can choose).  Or I can just log on to my Bloglovin' account at any time and see all the new posts my favourite bloggers have written.  Either way, it's effortless and well organized.

Plus they even have a Bloglovin' App for iphone so you can follow all of your favourite blogs, including mine ;) anywhere you go.


Follow on Bloglovin


Sunday, April 14, 2013

Peanut Butter Bent Balls of Yum

In order to broaden my repertoire of menu items I've been trying a number of new recipes I've found online.  Some have been amazing and some, well, not so much. A few however, have made it onto my list of regular menu items.

One of the many things I have been trying to make is healthier desserts or sweets. This is because I have a HUGE sweet tooth. I'm not kidding. Sweets are my main vice. I need something sweet every day or things can get ugly.  ;)  So in an effort to still get my sweet fix but make it a healthier one, I have been trying various recipes. From Black Bean Brownies to Bent Bars (my own energy bar creation) I'm definitely starting to get the hang of this. There was one particular recipe fail, however, that made my hubby asked "Why don't you just cut down on the sweets instead of trying to  make these healthier versions?".  Seriously?!?  Did he not know me at all?  That's just crazy talk! Although, after a bite of those awful tasting squares I could kind of see his point, but in no way was it going to discourage me. So off I went in search of the next recipe to try.

Which brings me to my Peanut Butter Balls.  In the past, usually at Christmas I would whip up a batch or two of your standard PB balls consisting of PB (the sugary kind of course), more sugar, butter and sometimes for crunch, graham cracker crumbs. They were amazing.  They were also crazy fattening and unhealthy.  So when I found healthy versions online I knew I had to try them.

After making a few different recipes, I figured out what I liked best in each of them and decided to try and come up with my own version.  Much to my surprise - success on my first try!  I've decided to call them Peanut Butter Bent Balls and I thought I would share the recipe with you so you can give them a try yourself.

Peanut Butter Bent Balls

1/4 cup pecans
1/4 cup walnuts
1/2 cup dates
1 tbsp ground flax seeds
1/4 cup pumpkin seeds
1/4 cup natural peanut butter (or other nut butter) (not the kind that contains sugar)
1/4 cup maple syrup
2/3 cup oatmeal (not instant or quick cook)
1/4 cup unsweetened coconut
1 tbsp hemp seeds
mini chocolate chip (optional)

1) Place pecans and walnuts in a food processor and pulse until medium sized crumbs.
2) Add in dates and process until incorporated and a paste like consistency.
3) Add in flax and pumpkin seeds, pulsing until seeds are broken up.
4) Now it's time for the peanut butter and maple syrup. Again process until incorporated.
5) Finally add in the coconut, oatmeal and hemp seeds and blend until fully mixed together and no large chunks are visible. If you are adding chocolate chips, put them in at the very end and only pulse enough to incorporate.
6) Roll into balls and store in the fridge.
7) Eat and enjoy!


For the first batch (pictured) I didn't add the chocolate chips as I wanted to ensure that these little balls goodness could stand on their own without the added chocolate bliss.  But by all means add the chocolate, as much or as little as you see fit! Who am I to stand in the way of anyones chocolate fix.  Besides, peanut butter and chocolate, seriously who doesn't love them together?!  Right now, I'm dreaming of covering the next batch in chocolate for a girls night.  Not quite as healthy, but who wants healthy on a girls night??  :)

They may look like meatballs in this picture, but they are way more delicious.  ;)

Note: I used a 1" dough scoop to portion mine into balls and it made about 2 1/2 dozen.


Sunday, April 7, 2013

From Drab to Fab - Reupholstered Office Chair

Yesterday afternoon as I was sitting in the craft room working on a project, I looked up, and there it was again.  My old rolling office chair.  Just sitting there, ugly, ripped and mocking me.  That’s when I decided it was getting a makeover.  I have had that chair forever and it’s a great extra chair for the craft room when I have guests, but seriously, it’s just depressing to look at. 

 
So last night after K went to bed I went directly to the craft room and started dismantling the chair.  Thankfully it only took 6 screws and the cushions were removed.  I took a look at how they had attached the original fabric (drawstring and staples) and removed it. 
Then it was time to decide what fabric to use.  It took a little time to make up my mind since I have quite a bit of fabric, but I’m definitely happy with my choice.  Once the original fabric was removed from the cushions, I laid it as flat as I could over the new fabric and traced the shape with a pen and then cut it out. 
 

Instead of using the drawstring method they had done, I figured it would be easy to just sew some elastic all the way around the edge.  Same principle; different method.  It worked great!
After both pieces were sewn, all I had to do was slip them over the cushions and use the heavy duty staple gun to adhere them to the plastic backing so that they stayed in place. Then I screwed the chair back together.  Voila!
A much better looking, might I even say gorgeous, rolling chair that is now worthy of the craft room.
 

Monday, April 1, 2013

Easter Weekend Sugar Cookies

This year for Easter I decided to make iced sugar cookies.  I have been wanting try sugar cookies with royal icing for a while and decided this would be a great opportunity to try it.  About a month ago I was looking around for a sugar cookie recipe and a friend of mine, Mary, turned me on to a recipe she uses from this fabulous site called Sweetsugarbelle.  Not only will you find the cookie recipe on her site but also icing recipes, tutorials and a lot of inspiration.  Go check her out, you won't be disappointed.  This woman's cookies are incredible!!

After spending a ridiculous amount of time drooling over Sweet Sugar Belle's site I finally decided it was time to '(wo)man-up' and get my butt into the kitchen and make some cookies.  Thankfully my history with decorating cakes gave me the foresight to know that this was going to be a multistep process.  I planned on making the cookies Thursday night and then icing them Good Friday while my hubby took care of K.  There was no way I was going to try icing sugar cookies for the first time with my 2 year old running around. That's just pure crazy.  Not unless I wanted cookies that ended up looking like a 2 year old made them.  As testament to this, my friend Holley tried to bake AND ice her cookies all in one day with a 4 year old and a 6 month old  under foot.  Needless to say she ended up coming over for a tea (I think she needed something stronger) Friday afternoon in order to escape her "sugar-cookie hell".  She was a brave, brave woman to try such a thing.  Decorating sugar cookies (well) with kids around is strictly for the professionals or woman stronger than I (& Holley).  :)

I have to say that I was impressed with the cookie dough right from the get go.  It was easy to make, easy handle and the texture was gorgeous. I will definitely use this recipe for all my sugar cookie endeavours.


It was all going incredibly smooth and the first batch of cookies came out beautiful.  Then as I went to take the second batch out of the oven things took a turn.  A bad, fiery, smoky turn.  I have to say it's quite a shock to the system when you open oven door expecting to find beautiful cookies but instead you get a huge plume of smoke in the face and flames in the bottom of your oven.  Holy Mother of Pearl!  Turns out that my oven was giving me a not so subtle hint that I needed to clean it.  Whatever had previously spilt on the bottom of the oven had now decided to take this particular moment to burst into flames and completely scorch my cookies.  Perfect on top and black on the bottom, into the garbage they went.  Crap!


Burnt cookies in the garbage.

Thankfully it wasn't a total loss. I still had lots of dough left (I doubled the recipe) and after I scraped the burnt remnants off the bottom of the oven I realized that I could keep on baking.  The cookie gods were just testing me and it seems I had passed.  Phew! 

The rest of the cookies baked up as well as the first batch and I was feeling positive about tomorrow's decorating.


Even though I have iced cakes on and off for quite a few years I have never used Royal Icing (RI).  I always use buttercream and I have to say they are worlds apart.  Making the RI was easy enough but then came the changing of the consistency.  There are basically 2 ways to use RI to decorate the cookies: the pipe & flood method or the 20-second icing method.  Quite sadly the 20-second icing method does not mean it takes 20 seconds to ice your cookies - one could only dream, but for a beginner like myself I figured that this was the easier of the two to start with.  Easy, yes.  Quick, no, absolutely not.  I took quite a bit of time for me to prep all the icing and get it into my bags.  It wasn't the mixing of colours, but getting the consistency correct for the 20-second icing that took so long.  The first colour took what seemed like hours to get right.  I would watch Sweet Sugar Belle's video, add water to my icing, mix, time it - nope not quite right...and repeat. By my 3rd or 4th colour I had figured out that I could add quite a bit of water into the icing at the beginning which sped things up considerably.  Now it was finally time to ice!!

This was soooo much fun!!  RI is a very different animal to work with compared to buttercream, but once I got the hang of it I was in my happy place.  Baking and crafting in one project makes me a very happy girl.  By the time K got up from his nap I had about 1/4 of the cookies decorated, so I cleaned up the kitchen and put everything away to finish after K went to bed for the night.

It's now 8pm and I want to finish my cookies.  I pull out my first bag of icing and I can see that the icing has separated a little bit.  Hmmm, I better try it out on a piece of parchment first.  Ok...yeah, that's not quite right.  It came out watery and the colour seemed to have separated from the icing a bit.  So I go to the next bag of icing.  Yep, same thing.  Every bag had separated and become watery.  Well, poop!  So I took all the icing out of their bags, remixed them, added a bit more icing sugar to them and put them back in the bags.  I quickly realized when I started to ice the cookies that the consistency of the icing was now bit thicker and didn't flow and smooth out as nicely as the afternoon icing did.  In hindsight I probably should have just remixed the icing and not added more icing sugar to it.  But, it was a good lesson to learn.  So, not wanting to take all the icing out of the bags again (not a chance in hell) I decided I would make do with the thicker icing.  In the end it worked out quite well but you can definitely tell the difference between the afternoon version and the night version of the icing where I had used both on the same cookie.

Easter Sugar Cookies with Royal Icing


I got better and better as I went along and I tried some new techniques at the end with the flower and butterfly cookies.  Royal icing definitely takes some getting used to but I have to say it was so much fun!!  I am now completely hooked on icing cookies.   I ended up with left over icing and it is currently sitting in my fridge waiting to be used.  Now I just have to figure out what cookies to do next...


Tuesday, March 19, 2013

Long Awaited Apron

Last year for my sister-in-laws birthday I asked if there was anything in particular that she would like for her birthday. She responded that she didn't have an apron and asked if I would make her one.  Gasp!!  What?!  You don't have an apron?  How is that possible?  I have multiple aprons. I don't always use them, but I have them in case I don't feel like adding miscellaneous food to the dog slobber and toddler who-knows-what that is already residing on my clothes.

After getting over my shock, I decided there was no decision to be made and I was definitely making one for her.  Since her birthday was only a week or so from that point I decided I that I would let her pick out the fabric she wanted and then I would make it shortly there after.  So a couple months went by and she still hadn't picked out the fabric.  It wasn't that she was being picky, it was that when she was visiting we were usually distracted by our kids running around or our open bottle of wine, or both (don't judge).  So finally one night over a bottle of wine (kids were asleep) we hit the craft room and she picked out two fabrics she liked, one for each side.  Perfect!

Fast forward approximately 9 months later, her birthday is just around the corner again and I still hadn't finished the apron.  Pieces were cut, but since there wasn't enough fabric to make my usual apron I had to figure out another way to make an apron that suited her.  This didn't actually take me 9 months to figure out. It was more the fact that I would take it out, stress over the fact that I hadn't sewn in ages and needed to find matching fabric and then I would put it back and tell myself that I would get to it tomorrow.  If I haven't mentioned it before I will tell you now, I can be an excellent procrastinator.  But finally last week something clicked, I knew what I was going to do, the sewing bug came back and I set to work.  Two nights later I was done and I was asking myself why I hadn't finished it sooner.

I gave it to her this past weekend and thankfully she is one fabulous sister-in-law because she just laughed and thanked me.   I told her she had to model it for me as I always take pictures of my projects - it has become a weird habit.  So below is the long awaited (well to her) apron with both sides modelled.


This apron differs from my usual design in that there is no gathering, it is all flat sewn and I created a border around the top portion.  The waste ties are still very long and can be wrapped around the waist and tied at the front.  In these pictures she has it very loosely tied at the back and sitting on her hips more so than her waist.

Now I just need to figure out what to get her for her birthday this year...


Tuesday, March 12, 2013

Art Has Taken Over My Fridge

Up until now the fridge has been our display and go-to place for photos and Ks artwork but as of late it has become a bit of a crazy mess.  This is due to the fact that K is starting to do arts and crafts regularly and that he can also reach it and pull it off the fridge on a regular basis.  Not only does this mean that it is a constant merry go round of putting it on the fridge, K pulling it off, putting it back on the fridge, K taking it off, back on...you get the picture.  It also means that the sweet toddler artwork gets crumpled and torn.  So, I have been looking for a way to display his artwork (along with cards, pictures and such) that is decorative and can be easily changed.  Now I know he is going to make tonnes of art work in his life and you are probably thinking that it's not a big deal if some of it gets ruined, but honestly I'm not at that point yet.  Right now I think that every little creation he makes is amazing, at some point this may cause me to be featured on 'Hoarders', but until then just let me live in my toddler art bliss.

After (too) much time on Pinterest and Google looking for a way to display his masterpieces and  keep them out of his creative little hands I finally decided what I was going to make.  It was decorative, functional and I already had all of the supplies in the house.  The fabric display board was the answer I was looking for.


After looking at multiple versions online I decided that I would just wing it with what I had and figure it out along the way.  Most of the ones I saw were padded and for some reason I just don't like the look of it.  So for my version I used the following:
  • 2  16" x 20" framed canvases
  • fabric big enough to cover the front and sides of the canvas plus another 2" along each side
  • ribbon (discontinued Stampin' Up! ribbon I had and was waiting to do something with)
  • tacks
  • staple gun and staples
  • ruler (a flat & clear quilting/sewing ruler works best)
The method was very simple. 
  • Place fabric pattern side down on the floor and then place the canvas face down on top of it in the middle. 
  • Starting on one side pull the fabric over the side and onto the back of the frame.  Staple the fabric in place. 
  • Continue along this side of the frame, pulling the fabric up and over the back of the frame ensuring that the fabric is straight and even as you staple it down.
  • Once your first side is complete move to the opposite side and do the same process but this time pull the fabric tight before stapling it down to ensure that it is flat and smooth on the front of the canvas.
  • After you have completed the first two opposing sides continue with the last two sides in the same manner. 
  • When you reach the corners make a fold like you are doing a military style bed corner (basically folding the fabric to make a triangle that folds down).  Staple in to place.
  • Now that you have the fabric attached to the canvas it is time to attach the ribbon.
  • It took me a few measurements to figure out the ribbon spacing I wanted but I finally settled on 3" between each one.  Feel free to space yours to whatever suits your fancy.
  • The first piece of ribbon is going to go from one top corner to the opposite bottom corner.  Start by tacking one end of the ribbon (still on the roll) to the back of the frame at the corner and then pulling it across the front of the canvas tightly.  Tack into place on the back of frame and cut the ribbon from the roll. 
  • Using your ruler, measure 3" from your initial ribbon and tack into place as you did the first one.
  • Continue along, spacing out your ribbons the same way until you have covered your fabric in one set of diagonal ribbons. 
  • Then start placing your ribbons in the opposite diagonal direction.  This time however ensure that as you place them you weave the new ribbon under and over the ribbons already in place.  (see diagram below)


Once you have tacked all of your ribbons into place you are now ready to hang it and add all of your childs beautiful artwork.


Sunday, March 3, 2013

The Lego Cake

Since it’s been a while since I’ve blogged here I thought I would start by posting a few things I have done recently. 

At the beginning of January my best friend B's son was turning 9 and she asked if I would make him a Lego cake like the one I made for K for his first birthday.  Apparently her son had been talking about K’s cake since last year.  Now, I must start off by stating that the Lego cake I made for K last year was not one of my best; by a long shot.  It was however, a big hit with the kids, and honestly when it’s for a child’s birthday party that really is the only thing that matters. 

For K’s cake I went over many different options in my head before deciding that mini upside down cupcakes would make the best knobs for the top of the Lego pieces.  And since my history and proficiency with icing cakes has been with butter cream icing I figure that it wouldn’t be a big deal to just flat ice it all.  I mean I’ve iced dozens of rectangular shaped cakes before how hard could it be??  Holy mother of pearl!  Those little cupcakes were a pain in ass to ice smooth, especially if you don’t want there to be gaps or bulges where the knob meet the top of the rectangle.  Needless to say, by the end of it I was very frazzled, had given up on trying to make a great looking Lego cake and needed a drink.  And in case you don’t believe me when I say it’s wasn’t my best work I’ve added some photo proof. 
Crazy Lego cake:
Cake Fail

So when B asked me to make the cake I was just a tad hesitant.  It had been a year since K’s cake but I still had some post traumatic stress from it.   However, never one to back down from a cake challenge I decided that I would do it, but I would figure out a way to make it better looking and easier to make.  After much googling, I decided that candy melts and candy melt ganache were the way to go.  I hadn't tried this technique before but I figured it really couldn’t turn out any worse¸ could it?...  Now, some of you out there will ask yourselves, why not just use fondant?  It looks amazing.  Yes, yes it does and I have made cakes with it before, but most people I know don't like the taste of it.  And sometimes taste just has to win out over design.

So off I went, baked my cake in a 9 x 13 pan, let it cool, cut it into ‘lego blocks’ and then applied the apricot glaze.  So far so good!

Then it was on to the molded candy melts to make the knobs.  This was brilliant!!  Quick, easy and actually looked like Lego knobs.  Whoo hoo, things are working out great!


Now for the candy melt ganache.  It looks so easy online: simply melt, mix, and pour.  Well, now I’m not a complete idiot and so I know that it’s not going to be that simple, but it didn’t look like rocket science either.  So off I went to melt my yellow melts and make the ganache.  Step 1: don’t forget to chop your melts.  I forgot with the first batch and it takes waaaay longer for them to melt which in turn alters the consistency (at least that is my theory as to why it went wrong).  But I’m getting ahead of myself.  So melts are melted, I added in the cream and the ganache looked pretty good.  Then I poured.  Hmmmm... It didn’t exactly cover the whole cake, (which they said it probably wouldn’t) so I added more to the top of sections that were bare.  O...Kay...??    Now it just looks like I’ve melted processed cheese slices over top of my cake.  Not exactly the look I was going for, unless all of a sudden I’m making a square hamburger cake for his party. 

So, I try again. Same colour, chop the melts this time and pour again. A little less profanity and a bit better results. Still a bit lumpy but that’s okay, the instructions had said that 2 coats may be in order to get the smoothness needed for larger pieces of cake. I let it sit for a bit, reheat my ganache and pour over both yellow squares. Looking better!!  Less of a melted cheese look, but the original piece is still a bit off putting. So I decide to move on to another colour and cake piece now that I’m starting to get the hang of it.


Red piece – melted, stirred, poured and looks pretty good. 

Not crazy professional, but not like this either, lol!:
If you are ever in the need of some great laughs check out craftfail.com, you won't be disappointed.

Now for the large green block.  I was a bit worried with this one because the other small pieces were hard enough to cover so I thought this one would be worse.   Well, the cake gods must have been smiling upon me because both first and second layers of ganache went on very well and there wasn’t a swear word to be heard.

After letting the ganache harden for a little bit it was time to assemble the cake blocks into a Lego cake.  One of the things I thankfully had the foresight to do was put each cake block on to its own cake board so that it could be moved about somewhat easier, ‘somewhat’ being the operative word here.   Since they were ganached (is that a word??) while sitting on cooling rack there was still quite a bit of hardened ganache hanging down past the bottom of each cake block that I had to remove but still leave enough so that you couldn’t see the cake board they were sitting on.   This worked out relatively well as there were only a few spaces that didn’t quite meet up when the cakes were piled on top of each other.

Then, all I had left to do was add the candy melt knobs and make a border at the bottom of the cake to finish it off.  Hmmm, the border.  I had forgotten about the border until now.  At this point I was running out of time and didn’t have everything needed to make icing so I figured candy melts would do the job.  Note to self: think things through for a few minutes more before diving head first into candy melts for every answer.  And did I mention I was doing all the decorating of the cake the same afternoon I had to drop it off at my friend’s house??  In hindsight, not a brilliant use of time management, but when you have a toddler running around you cannot do this type of work while he is in the same house as you and awake.

But I digress.  Knobs were on and candy melts were melted for the border.   Now, I guess in my haste and exhaustion I forgot about the consistency of candy melts when they are melted.  They are not, I repeat NOT, the same consistency of icing.  So when I poured the melted candy into the decorator bag all it did was run right out the bottom.  Ya, you guessed it, more swearing. 


But I let it sit for a little bit and then I just used it like I would icing to do the border. Not the greatest border by a long shot but it got the job done with the supplies I had on hand. 


And, the birthday boy loved it!  Which in the end is really all that matters.

I figure the third time will be the charm if I ever decide to try a Lego cake again.  ;)  But I'm thinking at this point that will be a good ten years from now.

I'm Baaaack...

So here I am almost 1 year to the day from my last post.  Wow...I’m not sure what even to say about that.   I mean I know I’ve been busy, but to fall off the blog wagon again so quickly is shocking.   In my defence, I didn’t actually fall off it completely as I was still blogging over at stampindivas, but it’s a sad state of affairs when you gear yourself up to restart your blog and then a couple of short posts later you disappear.  What the...?

So what have I been doing with my year?  Well, I went back to work in May after Maternity leave finished in January.  I  had to find a job and it definitely wasn’t an easy task.  So now I’m back in an office setting again.............yeah, that’s how I feel about that.   It’s not my dream job, but it is a job and I’m smart enough to know that I’m lucky to have one.

Despite having to go back to work, I have to say that the last year has actually been wonderful.  My little K bug just turned 2 and watching him grow and change over the past year has been the most amazing thing to experience.  And let me be the one to tell you if you don’t already know, toddlers are busy!  I know.  It’s shocking.  But they are!  Busy, tiring, demanding, loving, adorable, amazing, exhausting, incredible, wonderful & busy.  I honestly thought I would still be able to do all the stuff I used to do once I went back to work. Yes, I was THAT naive.  Now there are some nights after putting him to bed the most I have the energy to do is a little tidying up before retiring to the couch for some surfing of the good old world wide web.  So, a lot of the time all the great crafty ideas I have stored in my head just don’t make it outside into the daylight.  I have managed to complete quite a few crafty things and the stamping is still relatively steady (and took priority) but I definitely haven’t done as much crafting as I would have liked.  Although to be honest I would have to quit my day job to do as much crafting as I would like.  ;)

All that being said, I’m here once again at the start of a new year stating that I’m going to start blogging again.  I know, I know, I said that last year, but really honestly truly I mean it this year.   And if I fall off the wagon again, rest assured I’ll be back in Jan 2014 singing the same tune.  J

Sunday, January 29, 2012

The Zone is Pretty Comfty

There are times when you need to step out side your comfort zone.  And right now I'm trying to decide whether or not I want to take that uncomfortable step. 

There is a call out for an exhibit in my area at the beginning of March and I'm trying to decide whether or not I should take the leap and participate in it.  I have never done anything like this before and the type of work they are looking for is something that I have only done while taking the course about 3 years ago.  The weird thing is that over the past few weeks I had been thinking about trying my hand at this craft again and when I got the email about the show last week it was almost as if the universe was trying to tell me to get off my butt and do it already.  

Now here's the dilemma, (1) I haven't done this in years, so it's about brushing up on the process and trying to remember how to do it properly again.  (2) I need to come up with some new pieces/designs in a very short period of time. (3) This would be good exposure and a great learning experience, but waaayyy scary to put my work out there like that.  (4) Is my work even good enough to show? (5) It's only a month away.  (6) It's only a month away and will be waaayyy scary to do.  Oh sorry, did I say that already.  :) 

So I think I'm going to take the next couple days and really try and figure out if this is doable.  Doable in that I am able to show work that I'm proud of and at the same time not turn into a complete raging crazy woman trying to get it all done in the next month.  My zone is pretty warm and cozy right now, it's hard not to want to stay here.  Decisions, decisions... 

I'll keep you posted.

Friday, January 20, 2012

A Peek Inside

I have to say that moving my craft room from the basement to the main floor of the house was one of the smartest creativity inducing moves I've done over the past couple years.  Even when I'm not crafting I spend quite a bit of time in here.  For instance, right now I'm sitting in here in my lazy boy writing this post.  It's also my go-to place when I need some quiet me time.

So, since this is 'where all the magic happens' I thought I would take you on a little tour of my crafty space.  :)  Although I am continually moving stuff around and reconfiguring working space depending on what craft I am working on, this is the general layout at the moment.

Welcome...
Your view as you first walk in the craft room from the front hallway of our house.
My wonderful Ikea cubby unit which houses a great many crafting tools and supplies.  To the right, my new photo box (the perfect Christmas present from my hubby and son) which I am learning to use to take pictures of my creations.
This second door leads to the kitchen where I can grab a quick bite and refreshment when my energy needs a little boost.

My wonderfully comfy lazy boy chair where I can sit and relax or work on my laptop while enjoying the beautiful view outside.  Behind the chair is where I store all my supplies that I don't use on a regular basis - yes there is a lot of that.  Too many years of too many different crafts.  ;)
More supplies...and a view of my front yard.
And almost back to where we started.